How to Build a Student Portal in WordPress: The Complete Guide (2026)
Learn how to create a secure student portal in WordPress from scratch. This 2026 guide covers LMS setups, private dashboards, gradebooks, and document sharing without coding.
Introduction
Managing student data, course materials, and communication channels through scattered email threads and spreadsheets is a recipe for administrative disaster. Whether you are running a small coaching institute, a university department, or an online academy, the lack of a centralized system leads to lost assignments, confused students, and frustrated staff.
The solution is not always an expensive, proprietary software implementation that costs thousands of dollars a month. You can build a robust, secure, and scalable student portal directly within WordPress—often for a fraction of the cost.
In this comprehensive guide, detailed for 2025, you will learn exactly how to transform a standard WordPress installation into a fully functional Student Management System (SMS). We will move beyond the basics of “just installing a plugin” and dive into the architecture of a secure portal. You will learn how to create private dashboards, manage secure file uploads, grade assignments, and ensure that your student data remains FERPA/GDPR friendly.
We will explore two distinct paths:
- The Full LMS Route: Perfect for structured courses, quizzes, and automated certification.
- The Light Portal Route: Ideal for administration, document sharing, and private feedback without the complexity of a full curriculum system.
By the end of this tutorial, you will have a production-ready blueprint to launch your educational portal this weekend.
1. Prerequisites: The Technical Foundation
Before installing a single plugin, you must understand that a student portal behaves differently than a standard brochure website or blog. A standard site delivers static content to anonymous visitors which can be easily cached. A student portal, however, relies heavily on dynamic content. Every time a student logs in, checks a grade, or uploads a file, the server must process a unique request that cannot be served from a generic cache.
This fundamental difference dictates your infrastructure choices.
Hosting Requirements for Dynamic Portals
Do not use cheap shared hosting ($2-$5/month tier) for a student portal.
Shared hosting environments often have strict limits on “PHP Workers”—the background processes that handle dynamic requests. If 30 students try to log in simultaneously to take a quiz or download a syllabus, a cheap shared server will choke, resulting in 500 Internal Server Errors or agonizingly slow load times.
Recommended Specifications:
- PHP Version: 8.1 or higher (Essential for modern LMS plugin security).
- Memory Limit: 256MB minimum (512MB recommended for portals with active quizzing).
- Database: MySQL 8.0 or MariaDB 10.4+.
- Object Caching: Redis or Memcached (Critical for speeding up backend queries for logged-in users).
Table: Hosting Tier Comparison for Student Portals
| Feature | Shared Hosting | Managed VPS / Cloud |
|---|---|---|
| Concurrent Users | < 10 active users | 50+ active users |
| PHP Workers | Limited (2-4) | Scalable (10+) |
| Security | Neighbor risk | Isolated environment |
| Best For | Testing/Dev | Production Portals |
SSL and Security Basics
Because you are handling student data—names, grades, emails, and potentially addresses—an SSL certificate (HTTPS) is non-negotiable. Modern browsers will flag your login forms as “Not Secure” without one, destroying trust immediately.
Most hosting providers offer free Let’s Encrypt SSL certificates. Ensure this is active before you even install WordPress.
Domain Structure: Subdomain vs. Subdirectory
Where should your portal live?
- Subdirectory (yourschool.com/portal): Easier for SEO authority to flow from your main site, but plugins on the main site might conflict with portal plugins.
- Subdomain (portal.yourschool.com): Recommended. This keeps the portal infrastructure separate. You can run a lightweight theme specifically for the portal while your main site uses a heavy marketing theme. It also allows for easier database segmentation if you scale up later.
2. Choosing Your Architecture: LMS vs. Client Portal
WordPress offers two distinct ways to build this, and choosing the wrong one often leads to a full rebuild six months later.
Scenario A: The Learning Management System (LMS)
Choose this if:
- You need to deliver video courses.
- You need automated quizzes with instant grading.
- You require “drip content” (releasing lessons week by week).
- You need to issue PDF certificates automatically. Key Plugins: Tutor LMS, LearnDash, LifterLMS, Sensei.
Scenario B: The Administrative Dashboard
Choose this if:
- You are a tutor managing offline students and need a place to share files.
- You need a “Client Portal” feel where every student sees different documents.
- You don’t need quizzes or video courses.
- You primarily want to display invoices, schedules, or manual grade reports. Key Plugins: MemberPress, Client Portal, Advanced Custom Fields (ACF), Customer Area.
For the purpose of this guide, we will focus primarily on Scenario A (The LMS Route) as it covers 80% of user needs, but we will include specific sections on how to strip it back for Scenario B functionality.
3. Step-by-Step: Building an LMS-Based Portal
We will use Tutor LMS (Free version availability) as our example architecture because it offers a modern UI and a robust frontend dashboard for students without needing paid add-ons immediately.
Installing and Configuring the Core Engine
- Install the Plugin: Navigate to Plugins > Add New and search for “Tutor LMS”. Install and Activate.
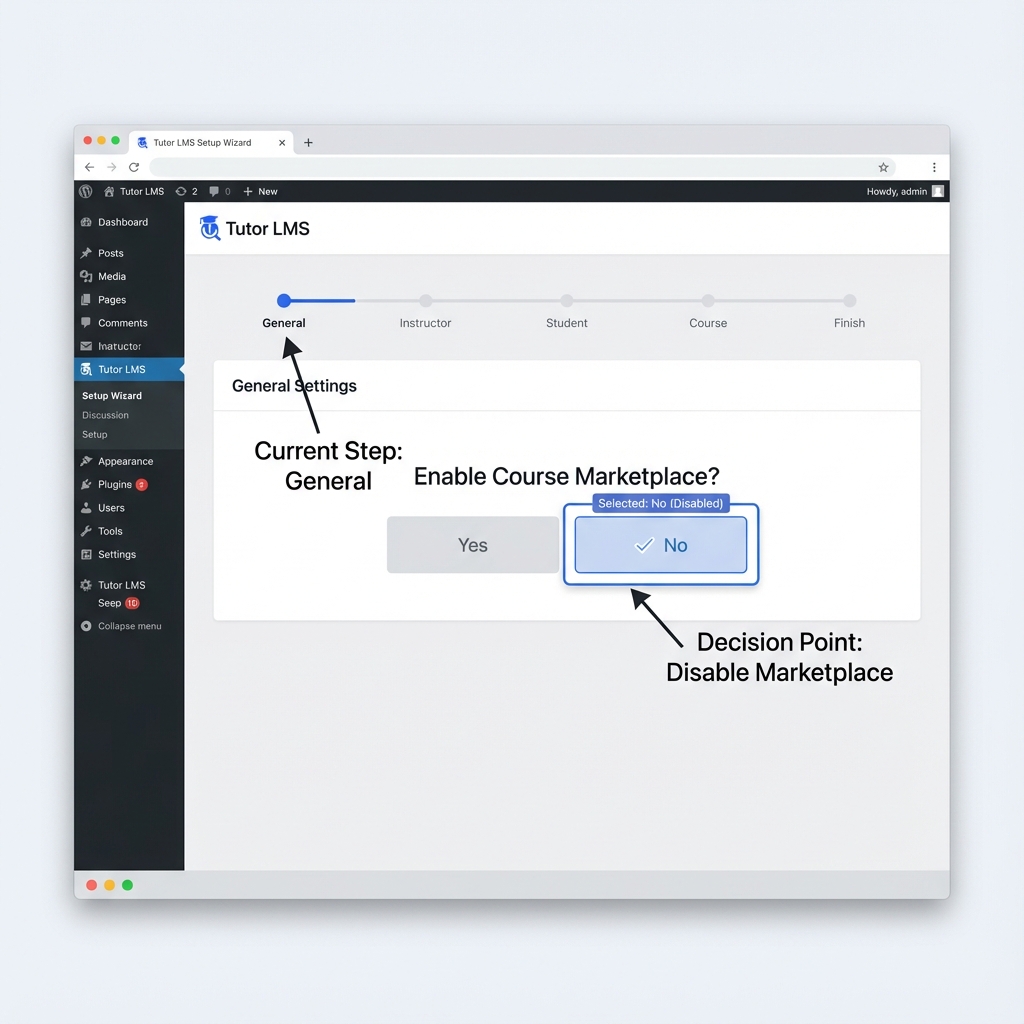
- Run the Setup Wizard:
- Course Marketplace: Select “No” (Unless you are allowing students to create their own courses).
- Dashboard: Tutor LMS will automatically create a page offering a “Student Dashboard”. Note the URL slug for this page (usually output as
/dashboard/).
- General Settings Configuration:
- Go to Tutor LMS > Settings > General.
- Public Profile: Enable this. It allows students to click on an instructor’s name to see their bio and other courses.
- Spotlight Mode: Enable this. It hides the header and footer when a student is taking a lesson, increasing focus.
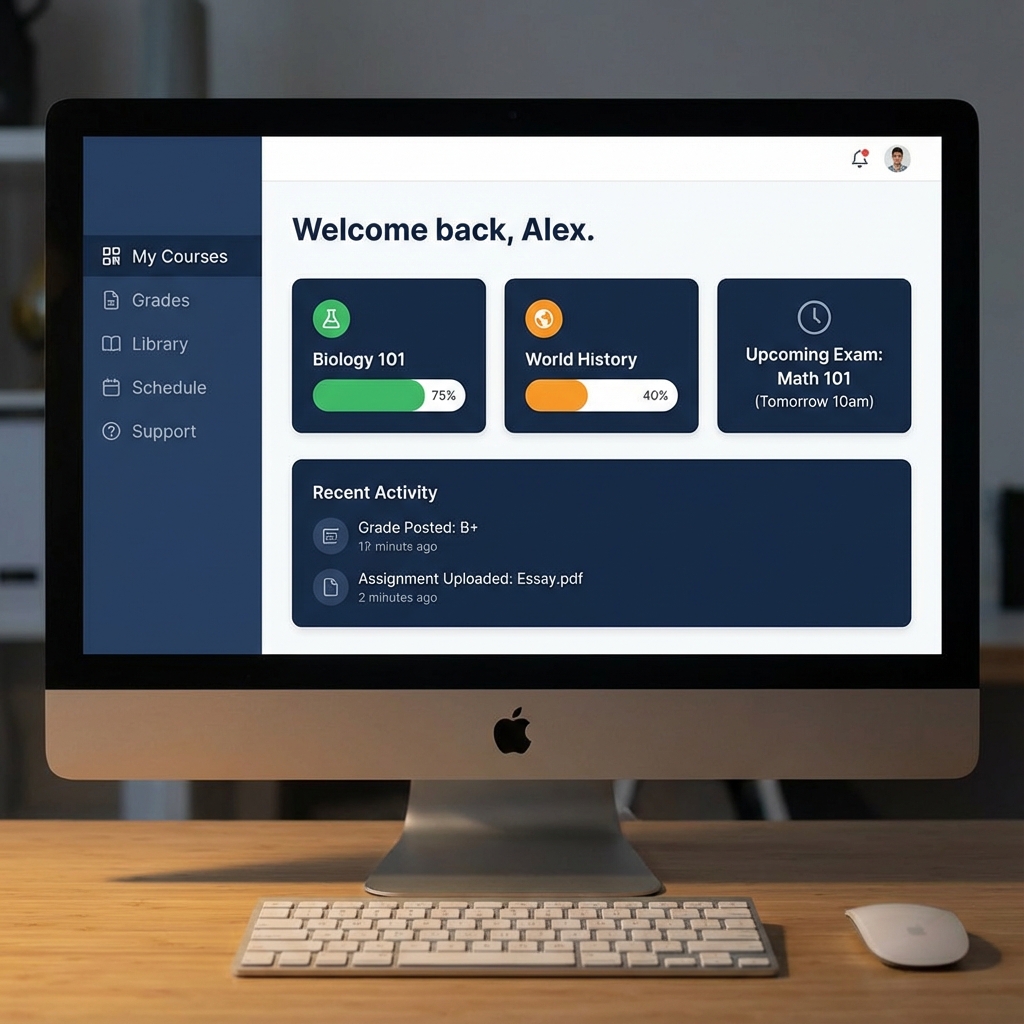
Visual Preview: The Goal
Here is what a fully configured student dashboard looks like:
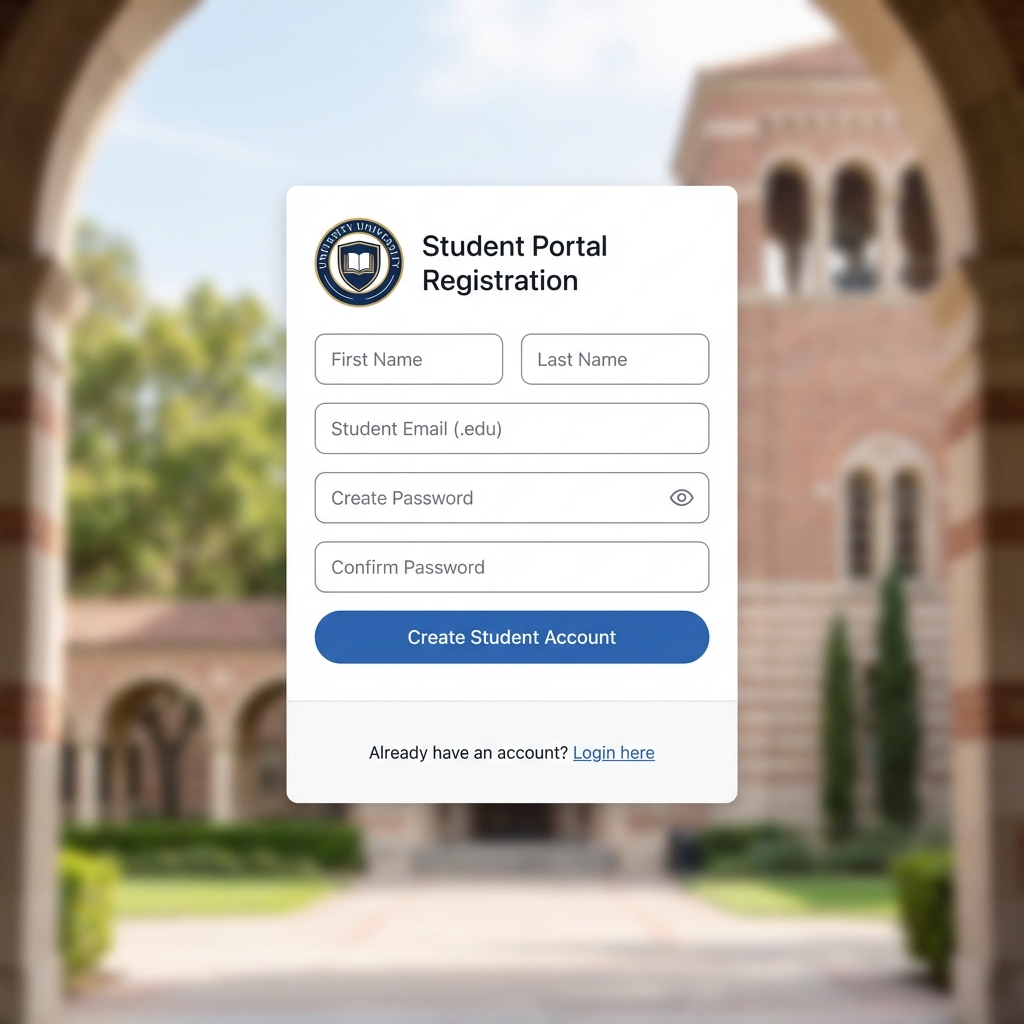
Creating Student Profiles and Registration Forms
The default WordPress registration page (wp-login.php?action=register) is ugly and branded with the WordPress logo. We need a custom, branded entry point.
- Enable Membership: Go to Settings > General in your WordPress dashboard and check “Anyone can register”. Set the “New User Default Role” to Subscriber (Tutor LMS will elevate this to ‘Student’ automatically upon enrollment, or you can force ‘Student’ role depending on your plugin settings).
- Create a Registration Page:
- Create a new page titled “Student Registration”.
- add the shortcode
[tutor_student_registration_form]. - This generates a clean form asking for First Name, Last Name, Username, Email, and Password.
Warning: Do not ask for too much information upfront. Every extra field decreases the conversion rate of your sign-up form. If you need phone numbers or addresses, ask for them inside the portal after they have logged in.
Setting Up Course Access and Restrictions
Even if your “courses” are just repositories for documents, you should structure them as a course to leverage the access control systems.
- Go to Tutor LMS > Courses > Add New.
- Title: “Semester 1 Resources” or “Biology 101”.
- Course Builder:
- Add a topic (e.g., “Week 1”).
- Add a lesson (e.g., “Lecture Notes”).
- Inside the lesson, you can upload PDFs, embed private YouTube videos, or write text instructions.
- Access Settings:
- Set the course type to “Free” (if internal) or integration with WooCommerce for paid access.
- Public Course: Disable this. You want this content protected so only enrolled users can see it.
Deep Dive: Creating Automated Quizzes
One of the most powerful features of an LMS portal is the ability to assess students automatically. This kills the weekend grading fatigue.
- Open the Course Builder: Inside your course, scroll down to the “Course Builder” section.
- Add Quiz: Click “Add Topic” > “Add Quiz”.
- Quiz Settings:
- Time Limit: Set a countdown (e.g., 30 minutes).
- Attempts: Limit this to 1 for exams or unlimited for practice.
- Passing Grade: Set the percentage (e.g., 75%).
- Adding Questions:
- True/False: Simple and quick.
- Single Choice: Standard multiple choice.
- Multiple Choice: “Select all that apply” (Pro feature in some plugins).
- Fill in the Blanks: Great for terminology testing.
- Feedback Mode: You can choose to show the answers immediately after the attempt (Practice Mode) or hide them until the quiz closes (Exam Mode).
Pro Tip: Always enable “Randomize Order”. This prevents students sitting next to each other from copying answers easily, as Question 1 for Student A will be Question 5 for Student B.
Setting Up Automated Certificates
Nothing motivates a student like a printable certificate.
- Design: Use the built-in Certificate Builder (or install the Certificate add-on). You can upload a background image (your school crest) and map dynamic fields like
{student_name},{course_name}, and{completion_date}. - Trigger: Certificates are usually triggered upon “Course Completion”. Ensure you have defined what completion means (e.g., must pass the final quiz).
4. Step-by-Step: Building a Document & Admin Portal
If the LMS route feels too “heavy” with its quizzes and lesson timers, here is how to build a lightweight Document Portal. This is often used by universities for administrative document management rather than learning.
Creating Private User Pages
We will effectively create a system where every user has a unique page that only they (and the admin) can see.
- Plugin Selection: Install “Customer Area” or “Client Portal” plugins. For a manual free approach, we can use “User Specific Content”.
- The Logic:
- These plugins create a “Private Area” custom post type.
- When you publish a file or page, you verify a box that says “Assign to User: [User Name]”.
- The Student Experience:
- Student logs in.
- They are redirected to
/my-account/. - They see a list of files explicitly assigned to them (e.g., “Report_Card_John_Doe.pdf”).
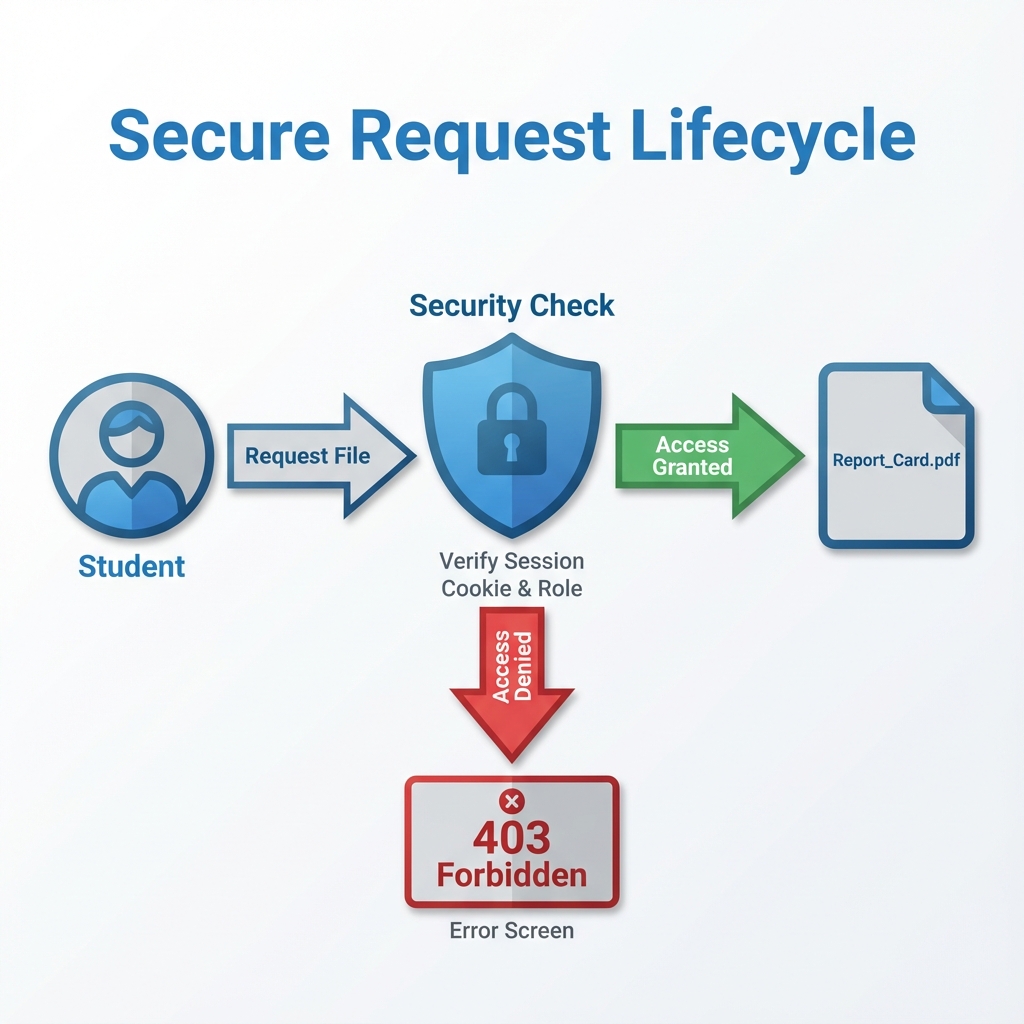
Implementing Secure File Sharing
Critical Security Warning: By default, if you upload a file to the WordPress Media Library, the direct URL (e.g., site.com/wp-content/uploads/report.pdf) is publicly accessible if someone guesses the link. Google also indexes PDFs if it finds a link to them.
For a student portal, you must protect these files.
The Solution: Download Manager Plugins Use a plugin like WordPress Download Manager or Better File Download.
- Upload the file through the plugin’s interface, NOT the media library.
- Set Permissions: “Allow Access to Roles: Student”.
- Effect: The plugin stores the file in a protected server directory (
.htaccessprotected). It generates a masked URL (e.g.,site.com/download/id=592). When a user clicks it, the server checks if they are logged in before initiating the download. If they share the link with a friend, the friend gets an “Access Denied” error.
Frontend Homework Submission Systems
In many portals, communication is one-way: Teacher to Student. But what if “John” needs to submit his history essay?
You do NOT want students emailing you 50 attachments. You want them uploading directly to the portal.
- The Tool: Gravity Forms (best paid) or Forminator (best free).
- Creating the Form:
- Field 1: Name (Auto-populated from User Profile).
- Field 2: Assignment Selector (Dropdown: “History Essay”, “Math Worksheet”).
- Field 3: File Upload.
- Configuration:
- File Type Restriction: Restrict to
.pdf, .doc, .docx. NEVER allow.phpor.exeuploads for security reasons. - Max File Size: Set this to 5MB or 10MB to prevent server overloading.
- File Type Restriction: Restrict to
- The Destination:
- You can set the form to email you a notification.
- Better yet, you can view all submissions in the “Form Entries” dashboard, sortable by student name.
5. User Roles and Capabilities Management
The fastest way to look unprofessional is to have a student log in and see the top black WordPress Admin Bar with the “New Post” button. You want them to feel like they are in a dedicated app, not the backend of a website.
Preventing Dashboard Access
You typically want to block students from seeing /wp-admin/ entirely.
- Code Snippet Method (Advanced): Add this to your child theme’s
functions.php:add_action( ‘init’, ‘block_users_from_admin_page’ );function block_users_from_admin_page() {if ( is_admin() && ! current_user_can( ‘administrator’ ) && ! ( defined( ‘DOING_AJAX’ ) && DOING_AJAX ) ) {wp_redirect( home_url( ‘/student-dashboard/’ ) );exit;}}Explanation: This code checks if the user is NOT an admin. If they try to access the backend, it boots them to the frontend dashboard.
- Plugin Method (Easier): Install “Remove Dashboard Access”.
- Settings > Dashboard Access.
- “Limit Dashboard Access to: Administrators, Editors, Instructors”.
- “Redirect URL: [Insert your Student Portal Page URL]”.
Customizing the Login Experience
The login page is the front door of your portal. Styling it builds trust.
- Use “LoginPress” (Free version is sufficient).
- Go to LoginPress > Customizer.
- Logo: Upload your school or institution logo.
- Background: Use a professional campus photo or a clean abstract geometric pattern.
- ErrorMessage: Customize the “Lost your password?” text to be more helpful, e.g., “Forgot Password? Contact the Registrar’s Office at 555-0123.”
6. Essential System Infrastructure (The Boring but Critical Stuff)
Building the content is fun; managing the plumbing is necessary. Two major issues plague almost every new student portal: emails not sending and large files failing to upload.
Fixing Email Deliverability (SMTP)
By default, WordPress uses the PHP mail() function to send system emails (Password Resets, “You have been enrolled” notifications).
- The Issue: Most hosting servers are terrible at delivering these. GMail and Outlook will block them as spam almost instantly because they aren’t authenticated.
- The Result: A student registers, never gets their confirmation email, and sends you an angry support ticket.
- The Fix:
- Install WP Mail SMTP content.
- Use a dedicated transactional email service like SendLayer, Brevo (formerly Sendinblue), or SMTP.com. Currently, Brevo has a generous free tier (300 emails/day) which is ample for most small portals.
- Configure the plugin with your API key.
- Send a Test Email: In the plugin settings, verify that the test email lands in your Inbox, not Spam.
Handling Large File Uploads
If a student tries to upload a final video project (500MB) and your WordPress limit is 2MB, they will hit a wall.
- Check your limit: Go to Media > Add New and look for “Maximum upload file size”.
- Increase the limit:
- Method A (Plugin): Install “Big File Uploads” – it reliably bypasses server limits.
- Method B (.htaccess): Add these lines to your
.htaccessfile:php_value upload_max_filesize 128Mphp_value post_max_size 128Mphp_value memory_limit 256M - Method C (Contact Host): If you are on managed hosting, you may need to ask support to bump this limit for you.
7. Essential Functionality Extensions
A basic portal allows access to content. A great portal facilitates management.
Adding a Gradebook
If you are using Tutor LMS or LearnDash, a gradebook is built-in for automated quizzes. However, for manual grades (offline assignments), you need a workaround.
- Gradebook for Tutor LMS (Pro) offers this natively.
- Custom Approach: Use a plugin like “TablePress”.
- Create a table with Student IDs and Grades.
- This is not dynamic per user unless you use a “filter by logged-in user” extension.
- Better Alternative: Use Gravity Forms or Formidable Forms with a “Views” add-on. Teachers submit a form entry “Grade for John: A-“. The View is set to “Show only entries created for Current User”. This is a powerful, low-code way to build a personalized grade card.
Event Calendars and Scheduling
Students need to know exam dates and holidays.
- Plugin: The Events Calendar.
- Setup: Create a category called “Student Only”.
- Restriction: Use a content restriction plugin (like Restrict Content Pro or the built-in settings of your membership plugin) to make the “Calendar” page accessible only to logged-in users.
- Tip: Embed the calendar simply on the main specific Dashboard page using the provided shortcode
[tribe_events view="month"].
Zoom/Live Class Integration
Post-2020, hybrid learning is standard.
- Video Conferencing with Zoom API: Most major LMS plugins have a Zoom integration add-on.
- Workflow:
- Administrator connects the API keys.
- Instructor creates a “Meeting” inside the WordPress Dashboard.
- The system automatically places a “Join Meeting” button on the Course page.
- The button only activates at the scheduled time.
- This prevents “Zoom Bombing” because the joining link is never public; it is gated behind the WordPress login.
8. Security, Compliance, and Performance Optimization
Educational portals define “mission-critical.” If the portal is down during finals week, you have a crisis.
Caching Rules for Logged-In Users
This is the #1 technical mistake beginners make. They install a caching plugin like WP Rocket or W3 Total Cache and configure it to “Cache Everything.”
- The Problem: Student A logs in. The page is cached. Student B logs in and sees Student A’s name and grades because the server delivered the cached version of the page.
- The Fix: Go to your caching plugin settings. Look for “Don’t cache pages for logged-in users”. Ensure this is CHECKED.
- Note: This puts more load on the server (see Hosting section), but it ensures data privacy.
Database Maintenance
LMS plugins can bloat your database quickly. Every time a student clicks “Complete Lesson,” a row is added to the database. Multiply 50 lessons by 1000 students, and you have 50,000 database entries just for tracking progress.
- Regular Cleanup: Use WP-Sweep or WP Optimize once a month to remove orphaned metadata and revisions.
- User Pruning: Use “Bulk Delete” to remove “Subscriber” accounts with zero activity after 1 year to keep the user table efficient (Ensure you export a CSV backup first for compliance records).
Two-Factor Authentication (2FA) for Admins
If a hacker gains access to an Instructor or Admin account, they have access to all student data. This is a massive liability.
- Plugin: WP 2FA or Wordfence Security.
- Policy: Enforce 2FA for all users with the role “Administrator”, “Editor”, or “Instructor”.
- Student 2FA: Generally, avoid enforcing this for students as it increases support tickets (“I lost my phone and can’t log in to take my quiz!”). Stick to strong password requirements for students.
FERPA and GDPR Compliance Checklist (Mandatory)
When handling student data, “Oops, I didn’t know” is not a legal defense. Whether you are in the US (FERPA) or Europe (GDPR), basic data sovereignty principles apply.
- Data Export: You must be able to export all data related to a single student if they request it. WordPress has a built-in “Export Personal Data” tool under the Tools > Privacy tab.
- Right to be Forgotten: Similarly, if a student leaves, you must honor deletion requests. Use Tools > Erase Personal Data. Note: You may be legally required to keep grade records for X years depending on local laws, which overrides deletion requests.
- Data Minimization: Do not collect Social Security Numbers or excessive private data unless absolutely necessary. Storing this on a standard WordPress install creates massive liability.
- Cookie Consents: Use a cookie banner (like CookieYes) that explicitly blocks tracking scripts until the user consents.
- Terms of Service: Explicitly state in your ToS that while you take security measures (SSL, 2FA), no online system is 100% invulnerable, and students strictly forbid sharing their passwords.
8. Internal Linking Strategy
- Pillar Content: Link to your main “WordPress for Education Guide” or “Best Hosting for Schools” articles.
- Contextual Links: When discussing security, link to “WordPress Security Best Practices”. When discussing hosting, link to “VPS vs Shared Hosting Comparison”.
(Note to editor: Ensure anchor texts are descriptive, e.g., “installing an SSL certificate” rather than “click here”.)
9. Frequently Asked Questions
Q: Can I build a student portal for free in WordPress? A: Yes. You can use the free WordPress core, the free versions of Tutor LMS or LearnPress, and a free theme like Astra. The only unavoidable costs are domain registration and hosting.
Q: Is WordPress secure enough for student data? A: WordPress itself is secure, but you must add layers of protection. Using 2FA (Two-Factor Authentication), strong passwords, and a reputable host makes it suitable for general student data. However, for highly sensitive government-level data, consult a cybersecurity expert regarding FERPA/HIPAA compliance.
Q: How do I handle 1,000+ students? A: WordPress can easily handle 1,000 users. The bottleneck is hosting. You will need a VPS or Managed WordPress solution (like WPEngine or Kinsta) rather than shared hosting to handle the concurrent database queries.
Q: Can parents have access to the portal? A: This requires “Parent/Child” account logic. Plugins like “LifterLMS” and “Tutor LMS” have paid add-ons specifically for this, allowing a parent account to view the progress of a linked student account.
Q: What is the best theme for a student portal? A: You want a theme that integrates deeply with your chosen LMS. “BuddyBoss” is the industry leader for community/learning sites. “Astra” and “GeneratePress” are excellent lightweight options that adapt well to any LMS plugin.
Q: Can I sell courses on my student portal? A: Absolutely. Most LMS plugins integrate with WooCommerce. You can set up a course as a “Product,” and when a student buys it, they are automatically enrolled in the corresponding course.
Q: How do I prevent students from sharing accounts? A: You can use plugins like “LoggedIn” to prevent multiple simultaneous logins from the same user account. If a student logs in from a new device, the old session is terminated.
Q: Do I need to know how to code? A: No. 95% of the functionality described in this guide uses “Drag and Drop” builders and toggle settings. Custom coding is only required for very specific aesthetic changes or advanced logic.
10. Conclusion
Building a student portal in WordPress is one of the highest-leverage investments an educational organization can make. You own the data, you control the features, and you avoid the “per-user” licensing fees that SaaS platforms charge.
Whether you choose the robust LMS route for delivering automated courses or the streamlined Client Portal route for secure document management, the key is to start with a solid foundation. Invest in good hosting, strictly manage your user roles, and keep your plugins updated.
The tools available in 2025 make this accessible to anyone with a weekend to spare. The barrier to entry has never been lower, but the value for your students—a professional, organized, and accessible learning environment—has never been higher.
Ready to start? Begin by securing your domain and setting up a fresh installation of WordPress today.
Download our free “Student Portal Launch Checklist” PDF to ensure you don’t miss a step during your setup.


Leave a Reply
You must be logged in to post a comment.